Pre-requisites:
First of all save all the brushes that you have already loaded in photoshop. Don't know how to? Let me show you.
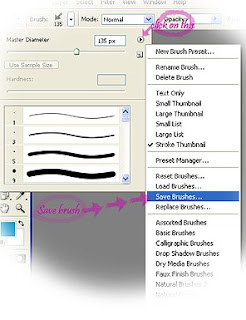
Follow 2 easy steps, shown in Fig. 1, remember to select the brush tool and then click on the brush present picker.
 Fig. 1
After you hit the brush present picker, you'd see a tiny play button on the top right side. A drop down menu would appear infront of you. Scroll down and click on save brushes. That would save all the brushes that you already have. Make sure that you save the brush sets in the *brushes folder*, where you have your *photoshop application* installed.
Done saving the brushes? Delete all of 'em now so when you're creating new ones, you'd be able to save 'em individually.
Alright then, lets get to work! :)
Fig. 2
Starting the tutorial:
1) How to formulate a signature.
Select your favorite font and write down your name/ nick that you use for your photography. I've used two fonts here, if you like you can use only one.
Then use brushes to ornament your sign. I used these fairy brushes in this example. You can download them from deviantArt.
Fig. 3
2) Cropping the signature and saving it as a .jpeg image.
Now the fun bit.
3) Close all windows in photoshop and open the signature jpeg.
4) Go to Edit > Define brush present.
5) You'd see photoshop has picked up your signature and wants you to name it. Name it whatever you want to and save it.
6) Now go back to the brush present picker and you'd see that your signature brush has been added! :D \m/

7) Whoa! :D You have your very own signature now!
8) Save it like we did in Fig.2.
9) Dance about, you did it! :D haha
Hope you guys find it helpful! =)
Credits:
DeviantArt ( I'd try to look up the link of the artist whose tutorial I used for reference!)


